Monday, September 30, 2013

33DC Day 4: Tribal and Born Pretty Store Nail Art Brush Review


Today is the Tribal prompt for the 33DC. And let me tell you I was not excited at all. I have failed in the past. But today I think I did a pretty darn good job! Wanna know my secret?


This Acrylic Nail Paint Drawing Brush Kit from Born Pretty Store! These brushes are pretty amazing. They come in little tubes that reminded me of knitting needles! :) They also have the little plastic tubes that are directly on the brush. But it's nice that if you lose that you still have the bigger tube to keep them protected!


I wanted to review this Acrylic Nail Paint Drawing Brush Kit because it comes with 4 brushes sizes: 0, 00, 000, 0000. The brushes are just the right size for me and they are good quality too. They are better than the ones I have used in the past that I got at another place. I really wanted some smaller detail brushes and none of those really long brushes. And these are perfect for me!

I used the 0 and the 00 to do this tribal design with the help of Nailed It NZ's tutorial. (I needed some inspiration!)


These brushes worked perfectly for me! I think I have my new favorite brush set for my nail art! I want to thank Born Pretty Store for allowing me to review these brushes!

The Polishes I used were: OPI Get in the Expresso Lane, China Glaze Kalahari Kiss, KleanColor Metallic Orange, Milani White on the Spot, and HK Girl Top Coat.

And guess what? Born Pretty Store has created a 10% off coupon code for my readers! Click on the coupon and check it out! They have a lot of amazing items for nail art!


And don't forget to check out the ladies and their Tribal manis!

Friday, September 27, 2013

33DC Day 3: Tape Mani


Ah, tape mani, so we meet again. Grrrr! Today's prompt for The Crumpet's Nail Tart's 33DC is tape mani, my nemesis. But thankfully today's worked out well! If I do say so my self.

Shhhh! I reused a mani! This is my watercolor for the art prompt of The Digit-al Dozen Does It Again Art!

So my base is: two coats of OPI My Boyfriend Scales Walls. I then used OPI Fly, China Glaze Budding Romance, China Glaze Make Some Noise, and finally OPI Funky Dunkey. All topped with HK Girl Top Coat. Click the above link if you would like to see the watercolor before the tape mani!

Don't the colors match my blog wonderfully! :)


I then used stripping tape and OPI What Wizardry Is This? I love using textures in tape manis. Less dry time! Just look how the watercolor makes the camera wig out with the focus. The softness of the watercolor and the harsh lines of the tape mani are very interesting!


Don't forget to check out the others and their tape manis! And if you would like to join up, please visit: Crumpet's Nail Tarts on Facebook!

Wednesday, September 25, 2013

33DC Day 2: Most Used Polish


Day 2 of The Crumpet's Nail Tarts' presents 33DC. And today's prompt is most used polish. It wasn't until after I had created this mani that I found out it should be a white and should only be one color. Well heck. Oh well, I'm going to break the rules and still use it!

I ended up using three colors here. Kind of hard to tell, I know. But the base is three coats of OPI My Boyfriend Scales Walls ( used this as a base for a lot of nail art). I then did some dry brushing using Essence Romeo (also used a lot in nail art) and OPI Skull & Glossbones (great nail base). I topped it off with HK Girl Top Coat.


I think the dry brushing gives it a bit of a grunge look. I like it! What do you think?


Don't forget to check out the others and they manis! If you would like to join, please visit: Crumpet's Nail Tarts on Facebook!

Tuesday, September 24, 2013

Monday, September 23, 2013

Crumpet's Nail Tarts presents 33DC: Day 1: Dots


Welcome to a new challenge, Crumpet's Nail Tarts' 33DC and today's prompt is Dots. I always see these beautiful dotticure and wish I could make mine like that. Well I am right pleased with today's dots! 


I used OPI Skull & Glossbones as my base (two coats). I then did random sizes of China Glaze Custom Kicks, China Glaze Snap My Dragon, China Glaze Budding Romance, and Essence Romeo. It kind of had a vintage-like feel to it so I thought making it matte would complete the mani.


First time using NYC Matte Me Crazy and I love it! Look at that finish! And the formula was great!


Don't forget to check out the others doing the 33DC challenge. Would you like to join? Then come visit: Crumpet's Nail Tarts on Facebook!

Sunday, September 22, 2013

New Blog Layout!

Thanks to Missy over at Gnarly Gnails I have a new amazing blog layout! What do you think? Do you love it? I sure do! 
Just a quick post to announce it! :)


Friday, September 20, 2013

Need a Nail Art Challenge?

The challenge is The Crumpet's Nail Tarts 33 Day Challenge. I'm joining this challenge and going to be doing as many as I can

It starts on September 23 and only posts 3 times a week Monday, Wednesday, and Friday (MWF). Easy!

If you are interested, join Crumpet's Nail Tarts on Facebook!

Here is a sneak peak of what's coming!


And the dates!


Hope to see you there!

Thursday, September 19, 2013

ABC: H is for Orly High on Hope and Essence Hello Holo


ABC challenge and today is H. I recently got Orly High on Hope at Sally's on clearance and it is gorgeous! This is two coats and it was easy to apply! I love the pink shimmer it has! Just stunning! I wanted to add something to make this mani pop so I used three coats of Essence Hello Holo. All topped with HK Girl Top Coat.


Aren't they both just lovely! I really liked this mani a lot. Simple, but classy and made a statement!

Wednesday, September 18, 2013

September Spectacular Giveaway Winner!

Hello Owlets! Just wanted to let you know about the winner of The Digit-al Dozen September Spectacular Giveaway!


  Congratulations to Denise! She has responded and already picked out her prize! Thank you for all who entered! Welcome all new followers! I hope to hear from you see! Thanks!

Depotting My Shadows Part II


For Part I click here. So I mentioned in the previous post that I had to use 4 different ways to depot my shadows. The different ways are: straightener (which you saw previously), flame, oven, and no heat.

Sadly I didn't take any photos of the flame version or the oven version. I'm kicking myself for that. But I will tell you about them.

Flame: I have these Sephora palettes that are bigger and kind of fold out. And after taking them about so I was only dealing with the eye shadows, I realized they would not work for the straightener method. They have an edge so that the heat isn't able to get right up underneath. So I pulled out a lighter and held it on the back for a while. Then I used a thumbtack and poked through the back to push out the shadow. This method took a long time. I don't really recommend it. (it could be because these particular shadows were just a pain anyways!)

Oven: I followed this video: GossMakeupArtist: Depot Your Eyeshadows in Seconds. I turned my oven onto to 200 degrees F and baked them for about 5 minutes. Each time I pulled out the shadows I could only get 4 shadows out of the palette until I had to bake it again another 5 minutes. I also had to use a thumbtack to push them out. Told, you this Sephora palette was a pain. It doesn't have a name on the back except makeup palette. But finally after about an hour this palette was done!

No heat: I love the shadows that didn't have to use any heat! My fav!


Take this Tokidoki palette. 


Rip off the palette.


Peel off that white paper and voila you have your blush out! (shh, naked nails!)


Open the edges and peel back the cardboard until you see another white paper and peel that back.


Ta-daa! Your shadows are free! Easy!

A few other shadows all I had to do was stick a sharp object along the edge and they would pop free!


Forgot to show these. This is the thumbtack method that I used with heat. You can see that the back is a bit melted. I had put this Sephora palette on the straightener and still had a hard time getting them out. Sephora palettes have tiny shadows that have no real free edge to get anything into. So I stuck a thumbtack into the melted back.


And pressed! See it sticking out? Sorry it's a bit blurry. These little shadows are covered in sticky glue and are a pain to clean!


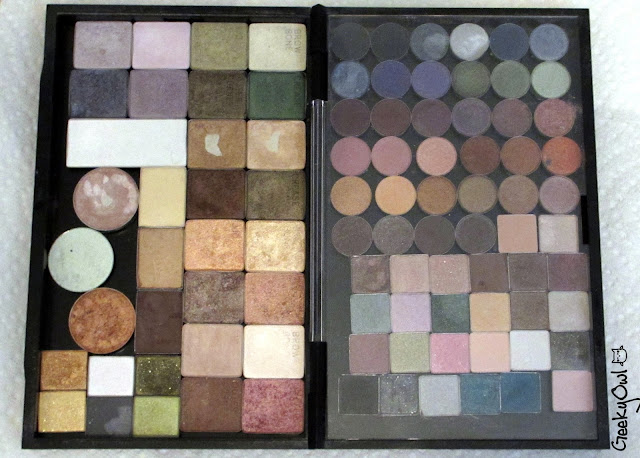
So here is one filled palette. On the left I have my Maybelline quads and a few randoms. On the right, under the clear divider, are my Sephora palettes. The round ones are the ones I used with the straightener and thumbtack. The squares are the oven method ones.


On the left are my Tokidoki quads and singles. I still have a few more singles to depot. They take a while on the straightener because the plastic is so thick. On the right are my Sephora monos and one Tarte square. The Tarte shadow was magnetic so it was simple! The Sephora monos had to be spun and they popped out. This video: How To Depot Sephora Collection Colorful Mono Eyeshadows helped me.


This palette is reserved for my Urban Decay shadows. I already have a few in here. But I haven't gotten to them yet. 


So you saw the full palettes and how little space they take up. Well here are the empty containers of those shadows! Look at all that! The top left Sephora one (above the big huge square Sephora one) was the one that gave me all the problems. I love that I don't have to deal with these containers anymore!


And these are the ones that I have left to do. All the pretty ones! Well, not that Urban Decay face one, that one is creepy! :)

So, that is what I have been busy doing the past few weeks. I can't wait to be done! I will probably reorganize the palettes once I am done to the ones I use most. But I am excited to be able to quickly see all my shadows! I am already using ones I haven't used in a while! It's fun! Like Christmas! :)

Interested in depotting? Check out these links
Manicurity: Adventures in Depotting
and search it out on youtube, there are a ton of videos!

Tuesday, September 17, 2013

ABC: G is for Golden Green (times 2) and Geeky Owl


Like a month ago I stopped with my ABC posts, well, here is G! Today is a comparison post. I have two polishes both named Golden Green. One is by CQ and the other is by Models Own. Let's take a look. Above you see both polishes at one coat each. CQ Golden Green is on my index and ring fingers. Models Own Golden Green is on my middle and pinky fingers.

Models Own Golden Green is a but more opaque and brighter than the CQ Golden Green. But the Models Own gave me a bit more of an issue while applying it, a bit gunky in places.


Two coats each of CQ Golden Green (index and ring fingers) and Models Own Golden Green (middle and pinky fingers). Pretty dang close! Which is fab because CQ Golden Green is easier to get here in the US because it's at Rite Aid. :)


One thing I did notice was that Models Own Golden Green which is on the nail on the bottom is brighter and more green with yellow. The CQ (nail on top) definitely has more golden olive hues in it. But since I really like this color, I'm glad I have both! (um, plus a few more that probably look like these!)


And here we have the debut of my other custom polish created by the wonderful Kevan of Dragon Lacquer. This glitter is called Geeky Owl. And I love it! A lot! It's varying sizes and shapes of grey glitter! What!? Grey?! Yep! I'm stoked! Thank you so much Kevan!


Macro shot of Geeky Owl by Dragon Lacquer to show you it's not bubbles but tiny glitters! Isn't it purdy! :)

I also used HK Girl Top Coat on this mani.

I'm so glad a stepped up and ask for custom made polishes. I was a little scared at first to approach and then worried I wasn't going to like them. But Kevan was wonderful to work with and I love the final product! Thanks again!

Monday, September 16, 2013

Depotting My Shadows Part I


Today is Part I of my depotting experience. For those of you who don't know, depotting is when you take the makeup/eye shadow out of it's compact and place into a palette (those three MAC palettes above). This frees up a lot of space with your makeup, no more bulky packaging! (And sometimes, sadly, no more pretty packaging). It also allows you to view all your shadows at once! Now they all can get some love!

At first, I was like no way, nope. I like my makeup all pretty in the containers I bought them in. But then I read this blog post by Emma over at Manicurity and I thought about it some more. And the more I thought about it, the more the idea grew on me. I have these large Sephora palettes that I never use because they are so big and not kept in my case with my other shadows. And I hate digging through my case and opening palettes to find the one I need. 

So after talking with Emma and figuring things out I decided to take the plunge and buy three MAC Cosmetics Pro Palette Large Duo. They are only $8! They are sturdy and have a plastic lid inside so you can use both sides!

As I was waiting for the palettes to arrive (they were on back order! Grrr!) I researched the many ways to depot shadows. I ended up using 4 different ways in my experience.


Here's part of my setup. I used a lap desk with wash clothes to protect it. There is my itty bitty straightener (hey, I have really short hair!) I have rubbing alcohol (which I put in a China Glaze shot glass and put it in the cup holder of the desk). I have the q-tips and sharp instruments and foil all ready and waiting to get started.


See, even though it's tiny it still works! But I can only heat up one thing at a time. But that's alright. I have the foil to protect my straightener. I let it set on there for a bit so that the glue melts. I used these older Maybelline shadows that I love but haven't used in awhile first, just in case I totally screwed this up! :)


Here's the mess it makes. Look at those yucky glue things! They totally look like earwax! Yuck! You can see the glue still stuck on a few shadows. I would then swab them with rubbing alcohol and scrap off the glue using orange sticks as well as old cuticle scrapper that I don't use.


Once it's all clean I stick a self-adhesive magnet on the back with the name of the shadow.


Just a quick shot to show you how much less room the shadows now take up! Fabulous! And that plastic lid that the old containers are on can be lifted to put more shadows on that side!


You can also use a scrapbooking circle punch for you circle shadows, like you Sephora Monos or Urban Decays. :)


Ok, so I ran into a problem. I did a ton of depotting and had them all magnetized and stickered but they kept falling out. What! This sucks! Why did I do this? Now my shadows are wrecked! But it was my magnets that were the issue. I bought the cheap stuff from Walmart. Boo! I went to Michaels and used a coupon to get these Aleene's Magnetic Sheets. And they are so so much better! Phew! Shadows saved!

Stay tuned for Part II on Wednesday where I show you a few tricks and some completed palettes!

Interested in depotting? Check out these links
Manicurity: Adventures in Depotting
and search it out on youtube, there are a ton of videos!