Showing posts with label Guest Post. Show all posts

Monday, October 27, 2014

Guest Post for Fixin' to Faff!

http://fixintofaff.blogspot.com/2014/10/guest-post-kirsten-of-geeky-owl.html

Check out this guest post I did for Ali over at Fixin' to Faff!

Thursday, November 21, 2013

http://beepolished.blogspot.com/2013/10/guest-post-kirsten-of-geeky-owl.html

Please go and check out the guest post I did for Bee over at Bee Polished a few weeks back!

Tuesday, September 24, 2013

Friday, August 17, 2012

Guest Post over at Mandy's Polish!

I did another guest post! This time over at Mandy's Polish! These are so fun to do! Please go over and check out my post and her amazing blog! Don't forget to follow her! :)


Wednesday, August 15, 2012

Guest Post Over at Sweet Sugar!

Hi Owlets! I did a Guest Post over at Sweet Sugar! Please go check it out and if you aren't already, please go and follow Sweet Sugar and her amazing blog! :)

Here is a sneak peek at the mani I did for her! 


Thursday, August 2, 2012

Guest Post by Ruby's Nails

Good Morning Owlets!

Today's guest post is by Ruby's Nails! She does some adorably awesome nail art and stamping!

Thank you so much Ruby's Nails! :)

Don't forget to check out her blog after reading this post!

*******************************************************

I'm so excited that Kirsten is letting me do a guest post on her blog. And it's my first guest post ever!

I decided to do something fun for everyone today, and I hope you like it!  Gradients seem to be super popular lately, and I decided to spice it up by adding some stamping. This look ended up being fun, yet could probably also work in an office setting.


I started with a base of Essie Brooch the Subject. It needed 2 coats. I'd say this color is as close to mannequin hands as I'll ever get!


Then I sponged on Essie Little Brown Dress using the gradient method from Sammy of The Nailasaurus


Finally, I stamped using Bundle Monster plate BM 203 and Barry M Gold Foil (an AMAZING polish for stamping). Finally I added topcoat and cleaned up all the mess!


Wednesday, August 1, 2012

Guest Post by PishPosh and Polish

Good Morning Owlets!

Today's guest post is by Kerrie over at PishPosh and Polish! (I love her blog name!) She does some great color combos and layering as well as nail art! Oh and I added her blog name to the photos. I wanted to make sure she got the awesome credit! :)

Thank you so much Kerrie! :)

Don't forget to check out her blog over after reading this post!

*******************************************************

Hello lovvies, while the lovely Kirsten is away she asked if I would like to do a guest post. Naturally I just jumped at the chance. Kirsten is such a sweet lady and has a fantastic eye for nail art, therefore I decided I wasn't even going to attempt nail art in her omnipresent presence. However one thing I will say for her is that she doesn't have enough pink on her blog. So I decided I was going to share with you a new beauty I have found. My new all time favourite pink. (Kirsten you don't have to thank me I have just single-handely saved your blog :P)

 
Anyway here it is for you. I know isn't it just eye-poppingly bright? And boy is this the definition of pink. This manicure consists of one coat of Yes Love shade K029 which is a European brand of polish I received in a swap last week. It is a fluorescent highlighter pink. Then I added one coat of KB Shimmers Shattered Hearts. Shattered Hearts applies like a dream a perfect neon cream, maybe half a shade lighter than the Yes Love polish. Suspended within are loads of Black hex's bars, shreds and hearts. I am a big sucker for shaped glitter polishes. What I love about this polish is the fact that you don't have to fish for the glitter and hearts. Even my OPI's require fishing so this is a major feat. You can see my the fact I have 4 hearts just here. Also because of the consistency of the base some glitter particles seemed submerged in the polish (think a jelly sandwich) while other remained sitting on top. 


One coat of Seche Vite and this manicure was perfectly smooth, even the hearts had no sticking up edges to snag. You can purchase over at http://www.kbshimmer.com/ I know I need the rest of her neon collection!


What do you think about this polish? Do you own any polishes from KB Shimmer? Do you like shaped glitter?
 

Anyway, thanks again to my wonderful host for giving me the opportunity of blogging here, Kirsten your blog is amazing! If you like what you saw here feel free to pop over to my blog at : http://pishposhandpolish.blogspot.co.uk/


Love Kerrie

Tuesday, July 31, 2012

Guest Post by Mandy's Polish

Good Morning Owlets!

Today's guest post is from Mandy at Mandy's Polish!  She creates some stunning stamped manis as well as amazing nail art!

Thank you so much Mandy! :)

Don't forget to check out her blog after reading this post!

*****************************************************

Hi, I am Mandy, from Mandy's Polish  I am excited to be guest posting here today for Kirsten.  I want to share with you an awesome holo I recently received.  I have had this on my wishlist for a little while and when it came in the mail, I just couldn't have been happier.  Nubar Reclaim is a beautiful green holo that is perfectly opaque in 2 coats.  I don't know about you, but I can't just paint my nails with a single color and go about my day.  So, I got out my stamping plates and got to work.  I chose Mash49, cause let's face it.  They are new,  I had to try them out :)  I used Konad Special Black and stamped with 2 different designs to spice it up a bit.  I love having 2 different mani's, every one notices when your hands don't match LOL.  Here is what I ended up with.  


I used to think that Nubar was such an expensive brand and figured I would never own any.  BUT.....you can get them pretty cheap on eBay.  Awesome holos don't have to cost an arm and a leg.  I hope you will try out some of the Nubar Holos, so far, I love them!!

Thanks for having me Kirsten and enjoy your vacation!!!

Monday, July 30, 2012

Guest Post by Munia's Nails!

Good Morning Owlets!

Today's guest post is by April over at Munia's Nails! I love her nail art and layering ideas (she comes up with some amazing layer concoctions!)

Thank you so much April! :)

Don't forget to check out her blog after reading this post!

****************************************************

Hey everyone! I am THRILLED to be doing a guest post for the lovely Kirsten! She is the sweetest girl!! I have never done a guest post before so this is quite exciting for me!! I wasn't quite sure what do for my mani because I wanted it to be perfect! Of course nothing/no one is perfect right?!

Anyway, I decided to go with some new polishes that I received in a swap. The base is Evelyn 05, it's a similar color to CG Secret Peri-Wink-Le, but the Evelyn is more purple. So I started with 2 coats of Evelyn 05, and was going to keep it as just the creme but I wanted more! So I used GOSH Rainbow (546). I put 1 coat of GOSH over Evelyn and it came out like this:


I hope you all like my mani here! You can see more over at my blog Munia's Nails! Thank you Kirsten for letting me do a guest post!!! <3

Friday, July 27, 2012

Guest Post by Gnarly Gnails

Good Morning Owlets!

Today's guest post is by Missy over at Gnarly Gnails! She does some insanely crazy nail art that it spectacular!

I have posted this one today because she has chosen an Indie polish for her version of TGIF: Thank Goodness, Indie Friday!

Thank you so much Missy! :)

Don't forget to check out her blog after reading this post!

*****************************************************

Hey there friends of The Geeky Owl!
I'm Missy, I do the thang over at Gnarly Gnails and today I'm doin' the thang over here!
When Kirsten asked for some people to guest post, I offered since she's a pretty swell lady and all. I'm sure ya'll know it already!

So, we share a love for Indie polishes, who doesn't these days, right?
Knowing this, I told her to go through my Pinterest stash and pick out a polish she'd like me to use in my guest post. She chose 3 and I narrowed it down to 2, both of which were Dollish Polishes, both of which were untrieds that had been sitting in my stash for far too long with no love.
My first choice was Cold Winds Are Rising, because it's just not one I ever see posted. Unfortunately, that polish kind of sucked, I'm sorry to say. It was a thick nightmare and getting any of the larger glitter out of the bottle proved a huge fail.
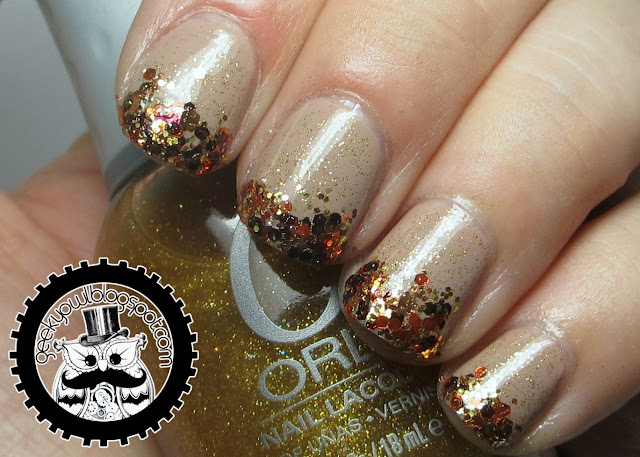
Enter Zombie Flesh.
Yes, I got this polish solely for the name.
And just like the other polish, it proved to be a bit of a nightmare.
Thick, not well pigmented and I could barely get the larger glitters out, as you can see, there must be a total of 6 pieces.
The good thing is that the pics look fantastic. In real life I loved this mani a lot less. It's kind of like when people say the book is better than the movie...well the movie is better in this case!
Alas...I'm not a complainer by nature..I do like the pics and in blog land that's about all that matters!
The base on Zombie Flesh is a sage green with green, black and gold microglitters and then larger black hex glitters.
These photos are 3 coats over one coat of Orly Luxe (a metallic champagne gold)


I can't do a guest post without a little nail art...so true to it's name, I turned Zombie Flesh into Flesh Eating Zombies with Gnarly Teeth!


Thanks for having me!

Thursday, July 26, 2012

Guest Post by Manicurity

Good Morning Owlets!

Today's guest post is by Emma from Manicurity! She does some pretty bomb-tastic nail art and shares the geekiness with me!

Thank you Emma! :)

Don't forget to check out her blog after reading this post!

**********************************************************

Apparently when I am asked to do guest posts I resort to glitter gradients! Sorry, I feel a little like a one-trick pony, but perhaps I can distract you with the shiny?


I've heard some nail ladies voice their disappointment in not seeing more attainable polish swatched and used on nail blogs lately, since some indies are just so hard to obtain - and I agree! So, I wanted to create a beautiful look with drugstore polishes that are easy to find.


First, I did one coat of Sally Hansen Pacific Blue! Sally Hansen XtremeWear is a brand I feel gets overlooked a lot, but it has some great colors and is usually on sale (like $2-$3). I paint slightly thick coats, but I only needed ONE! It was glorious. I topped it with SV and then did some glitter gradients starting from my cuticle.


I was inspired by my friend Elizabeth at Nailpolish is My Crack to do glitter gradients from the cuticle, plus a ring finger all-over accent. I sponged on Sinful Colors All About You, which has both micro gold and copper glitter. Then I sponged on some Milani Jewel FX in Gold to give it a more dimensional, molten metal look. On my ring finger I did a blobby coat of All That Glitters Gold Spotty Dottie (sorry, an indie) and sponged some of the Sinful Colors All About You on top.


Psst. Sally Hansen XtremeWear, Sinful Colors and Milani are available at a variety of drugstores and supermarkets for reasonable prices - and usually on sale. I'm a big fan of using CVS Extrabucks and they have a 'beauty' extrabucks program, to boot!


Thanks so much for letting me grace your blog for a post, Kirsten! I'm so glad we got to know each other at the beginning of this year doing the 31 Day Challenge and we share some geekery :)

Wednesday, July 25, 2012

Guest Post by Sweet Sugar

Good Morning Owlets!

Today's guest post is by Sweet Sugar! She does amazing stamping and nail art all with crisp bright pictures!

Thank you so much Sweet Sugar! :)

Don't forget to check out her blog after reading this post!

************************************************************

Hi dear Geeky Owl readers !
I was very honored when Kirsten asked me to write a guest post for her blog ! I just received my new Bundle Monster plates when she wrote me, so was there a better occasion than this one to use the cute little owl pattern from these ?
I know Kirsten used this stamp not so long ago in another post, but I just couldn't resist ;)

Here's what I did:


I started with two coats of Essence Show me the Way, a pretty blue-green creme. I wanted something sparkly so I layered one coat of Essence Glisten Up, a pretty sheer aqua polish with small flakes and tiny holo glitters. It's too bad they discontinued this one, I don't even have a back up !
Then I stamped the flowers and the cute owl from plates BM 306 and 309, using black Konad polish.

I love how the flakes pop under the black stamping, I tried different layerings combo on plastic tips for this manicure and this was definitely my fave.

I hope you like it, too :)

Thanks again to Kirsten for giving me an opportunity to make a post here, I had a good time choosing a manicure and writing for you ! :D

Tuesday, July 24, 2012

Guest Post by Time On My Nails

Good Morning Owlets!

Today's guest post is from Julie at Time On My Nails! She does some amazing nail art and uses such awesome bright colors!

Thank you so much Julie! :)

Don't forget to check out her blog after reading this post!

**********************************************************

Hello! I'm Julie from Time On My Nails, and I am extremely thrilled to be here! I generally stick to simple nail art - although right now I am addicted to jelly sandwiches - and get inspiration from all over, including other nail bloggers' fabulous tutorials! Recently Sarah at Chalkboard nails did a tutorial for a "Fishtail manicure" that looked like a fun and fairly easy way to combine multiple colours, something that I love to do!


My colour palette was inspired by an installation at the recent Luminato Festival in Toronto, which had a Windscape theme and included wavy blue bits and these really cool orange windsocks! And yes, that's the technical description! :P


My base colour was Essence Wake Up!, a great (cheap!) red-orange creme. My first swoops were China Glaze Secret Peri-wink-le, and the tips were Nails Inc. Baker Street, which might just be my favourite blue. Ever.


This design was fairly easy to achieve and had a great pay-off! The daring colour combination worked well for me and for the occasion, but with more subtle colours this could be adapted for any purpose.


A festival that celebrates creativity in all forms, from literature to music to theatre to magic to food, I think that Luminato fits in perfectly here at the Geeky Owl! Thanks so much for this opportunity to share my nail art with all of you, and Happy Canada Day!

Monday, July 23, 2012

Guest Post by Sassy Lacquer

Good Morning Owlets!

Today's guest post is from Carrie as Reflections, Sassy Nails, & Sill Diversions. She creates some gorgeous polish (Sassy Lacquer) and some awesome nail art! :)

Thank you so much Carrie! :)

Don't forget to check out her blog over after reading this post!

************************************************************

Hi there! I'm Carrie and I blog over on Reflections, Sassy Nails, & Silly Diversions! I am also the Face behind Sassy Lacquer, an Indie hand mixed nail polish line. Ever since I got into nail polish about a year ago now, I have been wanting to start my own line, and this year I did just that! I am a stay at home mom to four wonderful anxiety producing children! :)

I've decided to show you a few mani's from my vault....or memorable ones...

Bubbles

Sassy Lacquer, Read between the lines, my favorite of my line.

Sassy Lacquer, Uncle Sam, also a big favorite

My first water marble

Chick Chick

First time using a Matte top coat

A fun mani, but classy

fun, on the wild side

eeeew toes, but so neat!

More fun, but with polka dots!

I did this for my son, Hunter's, first birthday

eeewww more toes, but this combo is just so nice.

More polka dots

ugh! ewwww more toes, but santa clause style

another water marble

Can't forget my beautiful Daughter...this was for her Kindergarten Graduation, or sing along one of the two.

Lady bugs for my lady Bug.
I hope you all loved them as much as I did. Come on over and check my blog out sometime. I want to thank Kirsten for letting me post today.

<3 Carrie